The Sync function is the process of performing both an Update From JIRA and a Send To JIRA in a single step. Information that has been updated in Microsoft Project will be sent to JIRA and information that has changed in JIRA will be updated back into Microsoft Project. The Connector allows you to configure a variety of ways of performing this option. Most of the configuration of this process is done under the "Customize" option where you can select the fields you wish to include, the system (Microsoft Project or JIRA) that will be the master value of the field as well as a number of options on how the data is processed.
Note that the Sync process will NOT create any new issues in Microsoft Project. The only way to get new issues from JIRA to Microsoft Project is to use the Import process.
Sync All
The Sync All process allows you to synchronize tasks in your Microsoft Project plan with the issues that exist in JIRA. This process will do two steps, send information to JIRA from Microsoft Project and update Microsoft Project from JIRA. You must tell The Connector which system will be the master for the field. Some common examples are that Microsoft Project will be the master for the type and JIRA will be the master for any time spent. This means that when this process is run, the value of the issue type in Microsoft Project ALWAYS overwrites the value in JIRA and the time entered into JIRA will ALWAYS overwrite the values found in Microsoft Project. This is completely customizable based on individual requirements.
You can select to synchronize either selected tasks in Microsoft Project or choose to synchronize all the tasks in your project plan.
Note, any task marked with JIRAIGNORE as the issue ID will be excluded and skipped by this process.
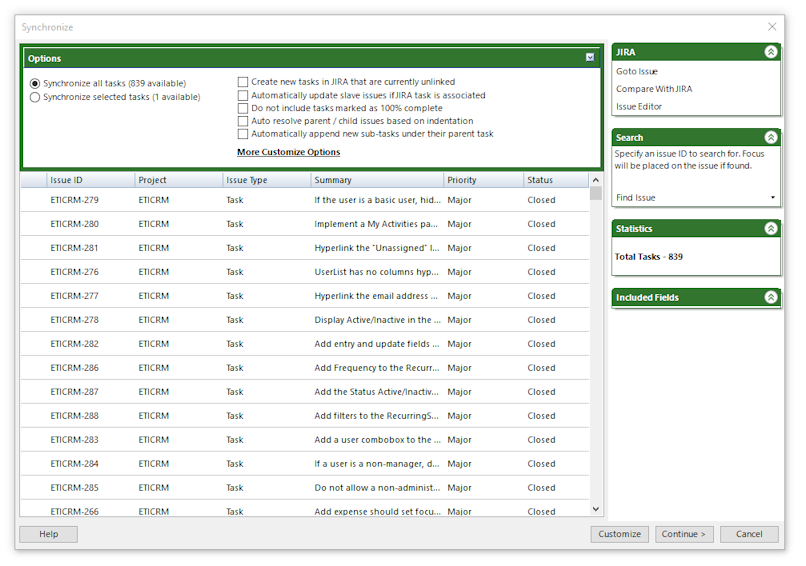
- Create new tasks in JIRA that are currently unlinked: This option will cause The Connector to create a new issue in JIRA if the issue ID field in MS Project is blank (unlinked).
- Automatically update slave issues if JIRA task is associated: If the Slave Issue configuration is enabled and the task has a Slave Issue ID set, the slave issue will be updated along with the primary issue.
- Do not include tasks marked as 100% complete: If Microsoft Project indicates that the task is 100% complete, it will be skipped during the processing of updating the issue in JIRA.
- Auto resolve parent / child issues based on indentation: The Connector will attempt to determine the parent / child relationship of new tasks that are about to be created based on the indentation levels that are currently defined in Microsoft Project. By default, The Connector does not require that issues and subtasks be organized in any specific way in Microsoft Project. You only need to have the parent issue ID correctly set.
- Automatically append new sub-tasks under their parent task: If this option is enabled, The Connector will add / append new sub-tasks that are found for a tasks that is being updated under its appropriate parent task. If this option is disabled, NO new issues will ever be added by this process. This allows you to control whether or not you want new tasks to be automatically added to your project plan.
- More Customize Options: Clicking this will bring you to the full Customize Options window.
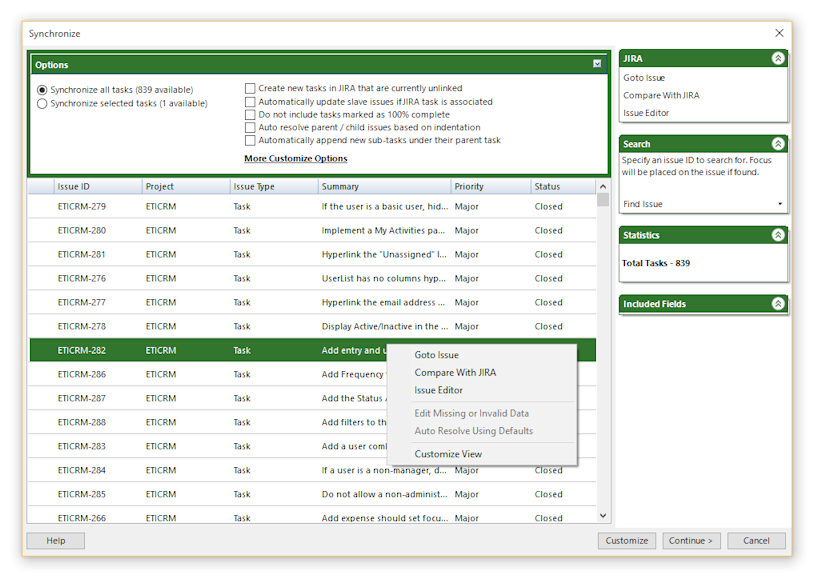
Right-Clicking on an issue will give you the menu shown above.
- Goto Issue: This will open the JIRA issue in a browser window.
- Compare With JIRA: This option will compare the values that are currently in Microsoft Project with the values that are currently in JIRA.
- Issue Editor: This will open the selected task in the issue editor so you can make any necessary changes to the issue before sending to JIRA.
- Customize View: Selecting this option will open a dialog where you can select the fields you wish to include in your view. You can select from any of the available standard fields and custom fields that are configured.
The Navigation Bar
The right side offers some information / navigational options.
- JIRA: The options here are the same that are described above when right clicking on an issue.
- Search: The search option allows you to specify an issue ID. Enter the value into the field and click the Find Issue. The Connector will select that issue in your list of issues on the left side of the screen.
- Statistics: The Statistics panel will show you some overall statistics on the issues you are about to update from JIRA. It will give you a total count and the number of new issues that will be created.
- Included Fields: This section gives you a quick glance at the fields you have selected for inclusion during the process. If the field is not selected and not included in this list, it will be ignored during any update process and the original values will be left intact.
When you are ready to begin the synchronization, click the Continue > button in the lower right corner. The Connector will begin synchronizing your selected tasks. You will be presented with a list of each of the issues as they are synchronized and any corresponding error messages.
Once the process has completed, you will see a summary of the total number of issues that have been successfully synchronized and failed along with the detail of the process below.
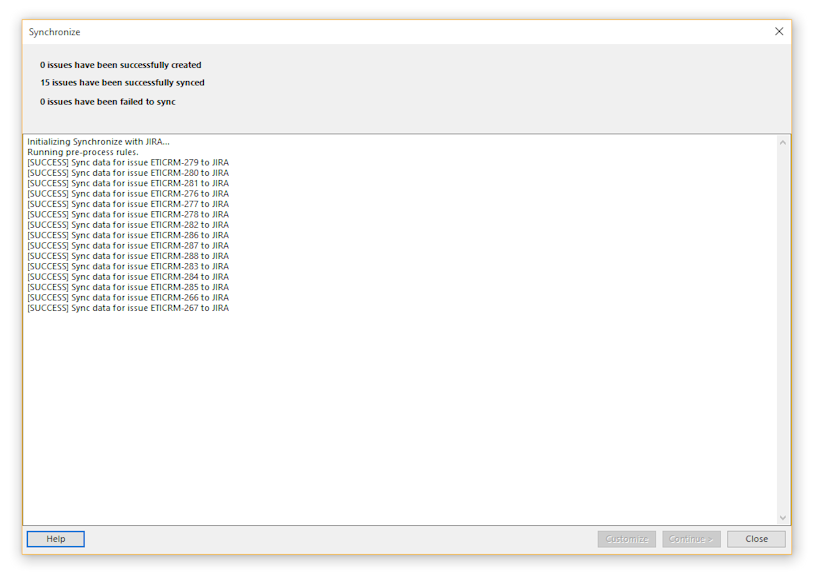
NOTE: If you have the "Stop on first failure" option enabed, this process will halt as soon as the first error occurs. If this option is not enabled, the error will be logged and the process will continue to the next task.
Sync All Customize
The Connector allows you to customize the way data is exchanged when it is synchronized with JIRA. You can configure these settings by clicking on the Customize button on the Sync All toolbar or by using the "Customize" button on the Sync All dialog.
General Settings
Synchronize all tasks: All of the tasks in the Microsoft Project plan will be synchronized
Synchronize selected tasks: Only the tasks that are selected in Microsoft Project will be included
Stop on first failure: If this option is checked, The Connector will stop processing after the first error occurs. If this is unchecked, the error will be logged and the processing will continue.
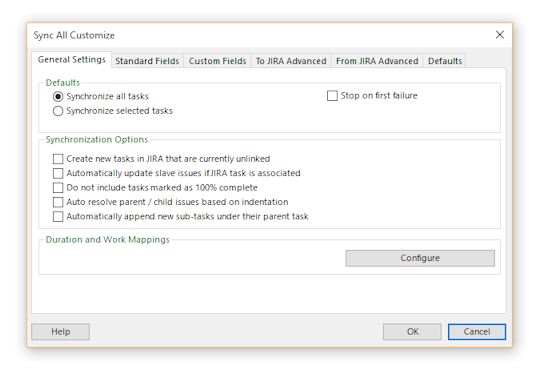
- Create new tasks in JIRA that are currently unlinked: This option will cause The Connector to create a new issue in JIRA if the issue ID field in MS Project is blank (unlinked). If you have new issues in your plan that are not associated with JIRA issues, and you have this option checked, the Send To JIRA function will try to create a new issue. It will use the default project that set up during the initialization process. The project ID can be overridden using the issue editor to pick a different project other than the default. If you have configured a default priority and issue type / sub-task type in the Customize options, these values will automatically be populated for blank values. If you do not have this option configured, you will be prompted for missing data. You must supply all of the missing data before you can continue with the Send To JIRA process.
- Automatically update slave issues if JIRA task is associated: If the Slave Issue configuration is enabled and the task has a Slave Issue ID set, the slave issue will be updated along with the primary issue.
- Do not include tasks marked as 100% complete: If Microsoft Project indicates that the task is 100% complete, it will be skipped during the processing of updating the issue in JIRA.
- Auto resolve parent / child issues based on indentation: The Connector will attempt to determine the parent / child relationship of new tasks that are about to be created based on the indentation levels that are currently defined in Microsoft Project. By default, The Connector does not require that issues and subtasks be organized in any specific way in Microsoft Project. You only need to have the parent issue ID correctly set.
- Automatically append new sub-tasks under their parent task: If this option is enabled, The Connector will add / append new sub-tasks that are found for a task that is being updated under its appropriate parent task. If this option is disabled, NO new issues will ever be added by this process. This allows you to control whether or not you want new tasks to be automatically added to your project plan.
The Duration and Work Mappings allow you to configure how The Connector calculates and updates the worklog, estimates and timespent values for each task. These settings are shared for the JIRA profile and will be the same for both the Send To JIRA, Update From JIRA and Sync All processes. Click here for more information.
Standard Fields
The second tab of the customization dialog will allow you to control which fields will be included in the exchange and which system will be used as the master. It is possible to have The Connector only update a subset of fields when running this process. This gives you much greater control over how you need this function to work. Next to each of the fields, you can see the Text location that the field is mapped to. Note that you must have the field mapped in your project to be able to select it for inclusion.
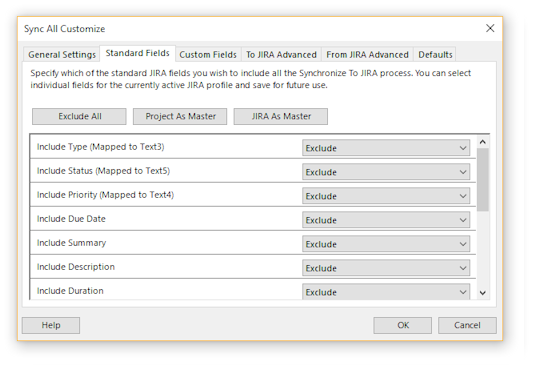
Use JIRA As Master: The data that is in JIRA will be used as the master so it will be updated from JIRA to Microsoft Project.
User Microsoft Project As Master: The data that is in Microsoft Project will be used as the master so it will update from MS Project to JIRA.
Exclude: The data will not be synchronized and will be excluded from the process.
Custom Fields
The Custom Fields tab allows you to select which of the custom fields you wish to include in the exchange and which system will be used as the master. Next to each of the fields, you can see the Text location that the field is mapped to. Note that you must have the field mapped in your project to be able to select it for inclusion.
Use JIRA As Master: The data that is in JIRA will be used as the master so it will be updated from JIRA to Microsoft Project.
User Microsoft Project As Master: The data that is in Microsoft Project will be used as the master so it will update from MS Project to JIRA.
Exclude: The data will not be synchronized and will be excluded from the process.
To JIRA Advanced
The To JIRA Advanded tab contains all of the options you can set for controlling how information is sent from Microsoft Project to JIRA. The settings are the same as the Send To JIRA Customize Advanced tab.
Check and warn if task is unassigned: If you configure JIRA to require an assignee for each issues, you can enable this option. Whenever The Connector detects that you have an unassigned issue, it will prompt you to assignee it before it gets sent to JIRA. This will prevent receiving an error from JIRA.
Enable task summary path for creating tasks: Summary task paths allow you to have a full path of the issue set on the issue summary in JIRA. Click for more information.

- Exclude parent task duration and work information when sending to JIRA: This option will not update JIRA parent task duration and time spent data. This can be used to prevent The Connector from doubling up duration information in JIRA. Microsoft Project forces the sum of all sub-tasks to be equal to the parent task. JIRA does not have this enforcement. Depending on how you use JIRA, the estimates in JIRA may be in addition to the estimates of the sub tasks.
- Update Actual Work / Duration to the JIRA Time Spent: If this option is checked the actual work or actual duration field of Microsoft Project will get updated to the JIRA time spent field. Typically the time spent field in JIRA is accumulated as work log entries are made. Enabling this option will overwrite those values in JIRA.
- Do not update original estimate if the issue has Time Spent: This option will prevent the original estimate in JIRA from being updated if the issue currently has time spent against it. This will allow you to preserve that value is needed.
From JIRA Advanced
Prompt if resource needs to be created: If this option is checked, The Connector will prompt you that a new resource has been found that is not currently in your project plan. You will have the ability to control whether or not the resource has been created. If this option is not checked, the resource will simply be automatically created for you.
Force resource change on update: This option forces The Connector to delete and then reassign the resource when updating a task.
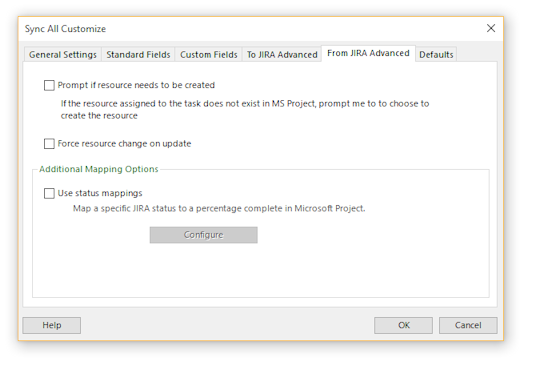
Use status mappings: The Use Status Mappings option allows you to have The Connector look at the current status of the JIRA issue and update the percentage complete based on the status, and not based on the worklog information. For example, you can say that if an issue is of status "In Progress" it should update as 50% complete in Microsoft Project and if an issue has a status of "Resolved" it should update as 95% complete in Microsoft Project. Click here for more information.
Defaults
The Defaults tab allows you to configure default values for priority, issue type and subtask type. If you have not specified a value for specific task, The Connector will auto-fill the missing information based on the defaults provided her if the option is checked.
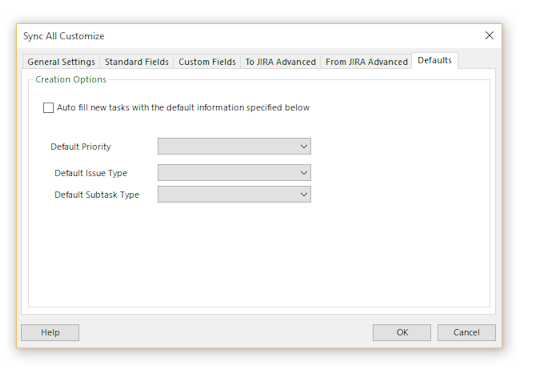
Note: These must be set if you will be creating sub-tasks in Microsoft Project and sending them to JIRA