Custom Date Formatting
This option allows you to configure the date format for JIRA and Microsoft Project if you are using non-English versions of either.
The setup for this is found on the JIRA Profile (Configure – Highlight JIRA instance and click Edit). Click on the Configure Custom Date Formatting link.
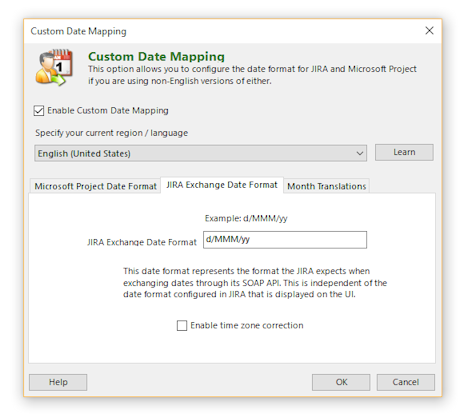
In order for The Connector to use these option you must check the Enable Custom Date Mapping box. Your current region/language setting should be displayed in the Specify the current region / language.
The Microsoft Project Date Format tab asks for the date format that is used within Microsoft Project. This date format represents the format you wish to have dates formatted in Microsoft Project. This will typically be the format you have Microsoft Windows configured for, but it can be different if desired.
The JIRA Exchange Date Format tab has the date format that represents the format that JIRA expects when exchanging dates through its SOAP API. This is independent of the date format configured in JIRA that is displayed on the user interface.

The Enable time zone correction option is available to adjust for daylight savings time if date/time transfers to JIRA is off by an hour.
The Connector can assist in determining what value should be entered in the JIRA Exchange Date Format. The Learn button will try to determine this format for you. Click on the Learn button.
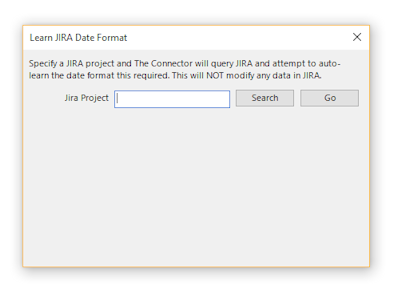
To Specify the JIRA project click on the Search button and choose the project from the list. Then click on GO. The Connector will analyze all tasks attached to this project and find any Custom-Date Picker type fields and determine the format. Click the Use Format button to fill the Format Detected into the JIRA Exchange Date Format.
The Month Translations tab is where the abbreviations for each month of the year are setup. Clicking the Set Months button will set those abbreviations based on the defaults for the language that Microsoft Project is set to.
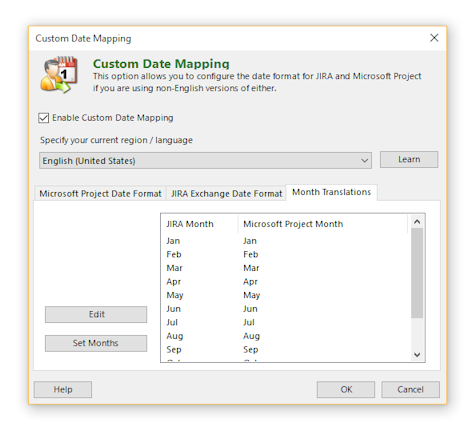
Click the Edit button to adjust these values to something other than the default. Click OK to save these settings.
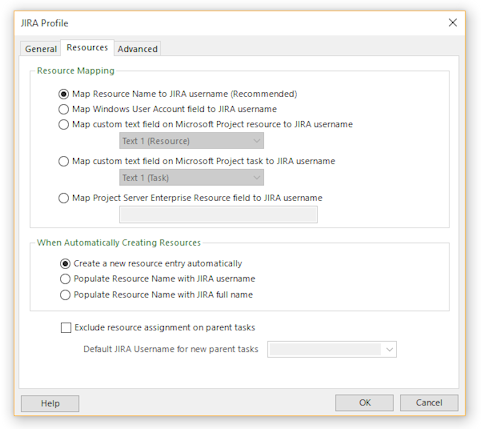
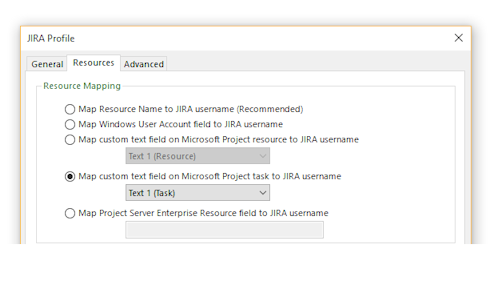
Resource Mapping
The Connector allows for multiple modes of mapping resources.
- Map Resource Name to JIRA username
- Map Windows User Account field to JIRA username
- Map custom text field on Microsoft Project resource to JIRA username
- Map custom text field on Microsoft Project task to JIRA username
- Map Project Server Enterprise Resource field to JIRA username
These options are accessed through the JIRA Profile (click on Configure – Edit – Resources tab).
Map Resource Name to JIRA username
The easiest and most basic way to map resource names is to ensure that the JIRA username and the Microsoft Project resource name are the same. This allows a one-to-one mapping when data is exchanged.
Map Windows User Account field to JIRA username
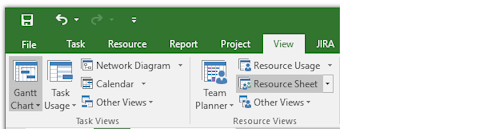
This will use the Windows User Account field (found on the resource in Microsoft Project ) to hold the JIRA username. On the Ribbon click View and then choose Resource Sheet.
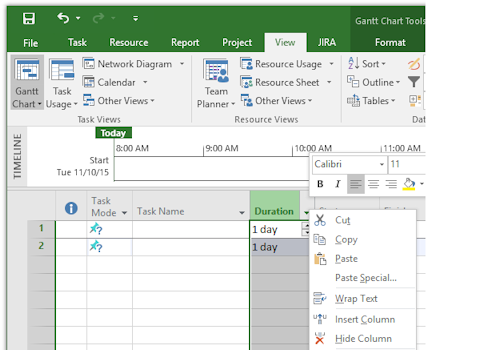
To make the text field visible so you can edit it, right click on the header of the resource sheet and choose Insert Column.
Choose Windows User Account from the list. In this column you must provide the JIRA username for the resource. This must match the username that is used to log into JIRA.
Map custom text field on Microsoft Project resource to JIRA username
Using the text fields on a resource in Microsoft Project allows for the most flexibility as you can have different names in Project then you do in JIRA.
JIRA requires that issues be assigned to resources based on the JIRA username (which they login with) not their full name. However, sometimes it is beneficial to use their full names in Microsoft Project or even a different login name should you integrate Microsoft Project with Project Server.
In The Connector the resource mapping is done on the Resources Tab of the JIRA Profile (click on Configure – Edit – Resources tab).
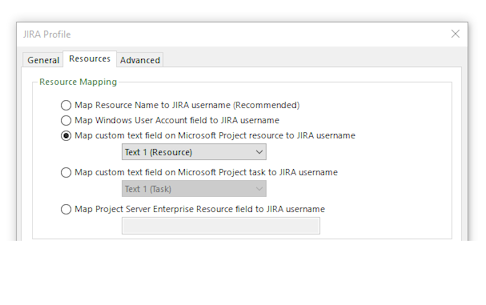
Choose the option Map custom text field on Microsoft Project resource to JIRA username.
NOTE: This field is a text field on the resource and is a different field then the text fields that are mapped on the task.
To configure the mapping, you must go to the Resource Sheet in Microsoft Project. This will give you a complete list of all resources that you have associated with this project plan.
On the Ribbon, click View and then choose Resource Sheet.

To make the text field visible so you can edit it, right click on the header of the resource sheet and choose Insert Column.

Pick the text field you selected in the previous Connector screen. In this new column you must provide the JIRA username for the resource. This must match the username that is used to log into JIRA.
Once you have your resource sheet configured, you can now use the full resource name. When The Connector exchanges data with JIRA, it will use the mapping to determine the correct JIRA user to associate issues with.
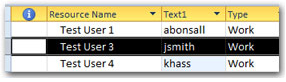
Map custom text field on Microsoft Project task to JIRA username
This will use a custom text field found on the task in Microsoft Project to hold the resource mapping. There are 30 Text fields on the task that can be used to hold this value. Be sure that it is a Text field that is not currently being mapped to hold other JIRA information.
On the Resource Tab of the Connector choose the Text field that you will be using for the JIRA User ID.
On the Gantt Chart right click on the header and click Insert Column, find the Text field that you chose on the Resource Tab.
When importing tasks from JIRA the username will populate in this field. With this option there is no relationship between Resource Names and JIRA User ID.
Map Project Server Enterprise Resource field to JIRA username
This option only functions with Microsoft Project Server 2010.
In Project Server a custom resource field needs to be setup. This is done through Server Settings – Enterprise Custom Fields and Lookup Tables – New Field.
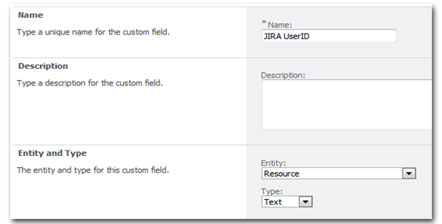
The Name for this custom field is what needs to be typed into the field on the Resource Tab of the Connector. The Entity must be Resource.
Now in the Connector settings (JIRA Ribbon – Configure – Edit – Resource Tab) fill in the Field Name.
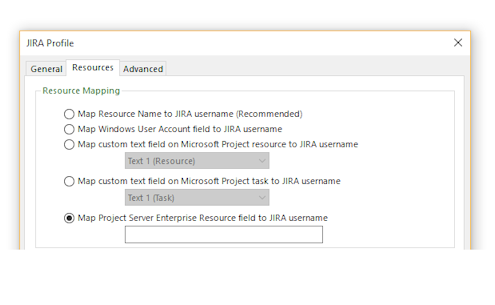
Now in Project Server the Resource Custom Field will be listed on the Resource and will need to be filled in with the JIRA User ID.
Resource Assignment with Parent Tasks
The Connector also offers the ability to exclude resource assignment on parent tasks.
When this option is checked a parent task with sub-tasks will import with no resource assigned to the parent. The Default JIRA Username is used when sending to JIRA as the resource that should be set on the parent task in JIRA.
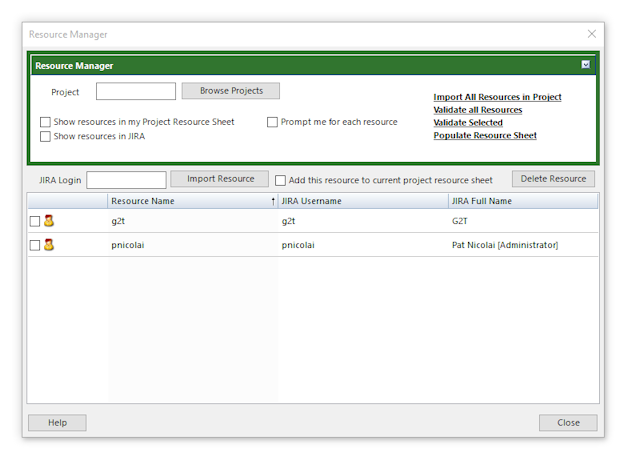
The Resource Manager allows you to import and manage resources from JIRA. This is accessed by clicking on Tools and then selecting Manage Resources.
The Resource Manager allows you to import and manage resources from JIRA. This is accessed by clicking on Tools and then selecting Manage Resources.
There are 3 filters available:
- Show resources in my Project Resource Sheet: If this is checked the list of resources shown will be limited to those that are already in the Project Resource Sheet.
- Show resources in JIRA: If this is checked the list of resources shown will be limited to those that are in JIRA.
- Prompt me for each resource: If this is checked when importing resources you will get a prompt asking if you want to add each resource.
Version Manager
The version manager allows you to view and add versions to any JIRA project that is loaded into The Connector.

The actions that can be done from this screen are links listed on the right:
- Import All Resources in Project: You can specify a project using the Browse Projects and then import those resources into Microsoft Project. The Connector will scan through all of the issues in the specified project and create a list of unique resources that are currently assiged to issues in that Project. This provides a easy way to quickly get a starting resource sheet for your project plan. NOTE: This process can take time depending on the number of issues you have in JIRA. The Connector will scan through each of those issues.
- Validate all Resources: This option will validate that all of the resources you have in your project plan are valid JIRA users.
- Validate Selected: This option will validate only the selected resources you have to verify that they are valid users in JIRA.
- Populate Resource Sheet: This option will take the users you have selected and create them as resources on your current project plan's resource sheet. You will need to close the Resource Manager screen before you can see the resources on your resource sheet
You can also add resources manually by typing in the JIRA login and clicking the Import Resource button. If you check the Add this resource to current project resource sheet then when the Import Resource button is clicked it will add the user to the resource sheet.
Status Mappings
The Configure Status Mappings allows you to configure The Connector to update the Microsoft Project percentage complete based on the status of the issue and the value provided here.
Example: If during the update from JIRA, the JIRA issue is marked as "In Progress", the Microsoft Project task will get updated to 50% complete (or whatever value is defined in the box below).
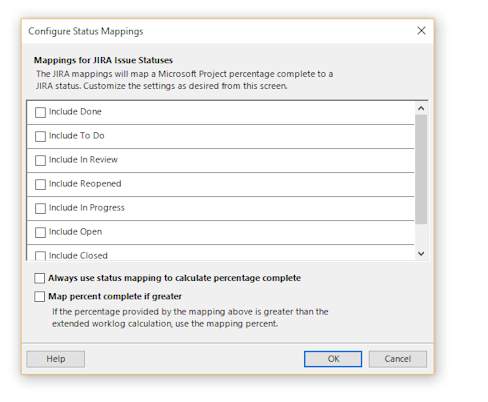
You can turn off individual status mappings by un-checking the option in the left most column. If an issue has a status that is not being mapped, its percentage complete will simply not be updated. Checking the Use this map always option will force the % complete to the percent filled in here and the work fields will be calculated based on this as well.
Always use status mappings to calculate percentage complete: This will always use the mapping irregardless of the calculation.
Map percent complete if greater: The mapping will only get used if the value is greater then the calculated value. You can configure this so that it will only use the mapping if the value is greater then the value that comes from JIRA. For example, if the percentage complete in JIRA calculates to 50% (8h task with 4h of actual work), and the issue has a status of "In Progress". If you have the map only if greater enabled and the "In Progress" mapping is set to25 %, it will use the greater of the two values. So the % complete field will populate with 50%.
NOTE: In order for this to work when updating tasks the option must be turned on in the Update from JIRA - Customize - Advanced tab.
Task Browser
The Task Browser is a tool that allows you to browse through all of the tasks that are currently in your Microsoft Project plan. This is accessed by clicking on Tools - Task Browser.
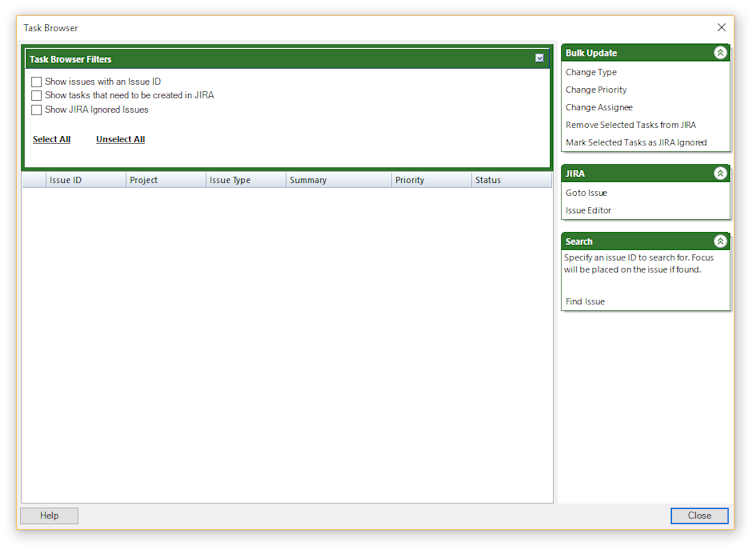
Using this utility, you can Control+Click multiple tasks and highlight them. The various processes of this screen will perform actions on the selected tasks only.
Filters
There are several check boxes at the top of the screen that can be used to filter the list. These represent three types of issues:
1. Issues that have an ID and are currently linked with an issue in JIRA
2. Issues that have no ID and need to be created in JIRA
3. Issues that are marked as JIRA Ignored meaning they will not be exchanged with JIRA.
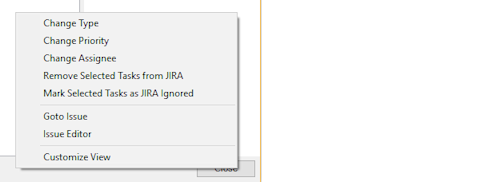
Bulk Update
There are several options under the Bulk Update panel that allow you to perform actions on the selected JIRA issues.
- Change Type: This will allow you to bulk change the issue type of the selected issues.
- Change Priority: This will allow you to bulk change the priority of the selected issues.
- Change Assignee: This will allow you to bulk change the assignee of the selected issues.
- Remove Selected Tasks from JIRA: This will allow you to in bulk remove selected issues from JIRA.
- Mark Selected Tasks as JIRA Ignored: This will allow you to in bulk mark selected issues as JIRA Ignored.
You can Right-Click on the issue list and get a context menu with the various options that are available on the side panel.
Customize View
The Customize View allows you to show and hide various columns in your list making it easier to view and organize you issues.
Search
This allows you to specify an issueID and then click on Find Issue and the issue will be highlighted in the list on the left.
Working With Custom Fields
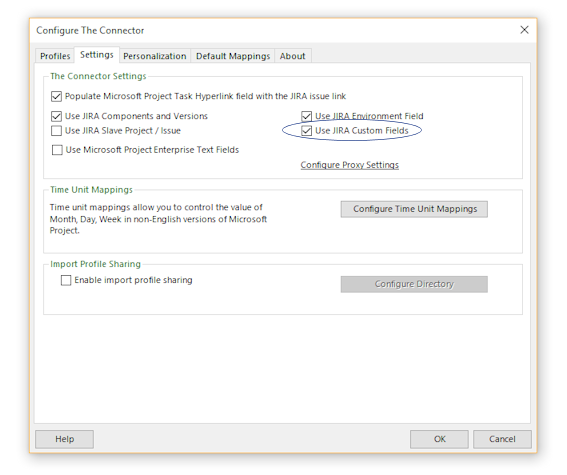
The Connector allows for exchanging of custom field data between JIRA and Microsoft Project. To use this function, you will need to enable the option under the configuration screen.
For demonstration purposes, we've created some custom fields in JIRA. One for a Customer Email, which we will store the customer email address and a Start Date which will be used to enter the Start Date for a task.
NOTE: Microsoft Project has 30 custom text fields that The Connector uses, but you can mix and match the values you wish to use. There are 5 mappings that are required but all of the others can be assigned as you wish.
The Custom Fields tab of the Project Information screen will allow you to add the Custom Fields to the project and specify the text fields that they will be mapped to.

Clicking on the Add Custom Field will open a window with all available custom fields from JIRA for the initialized project. Select each one that you want to have available for the project plan. To remove a custom field from the mappings click on the red X to the left of the field name.
Click here for information on setting up Enterprise Custom Fields
Once these values are configured, you can right click on the header of the Microsoft Project plan and choose the Insert Column function to add these custom fields to your task list in Microsoft Project.
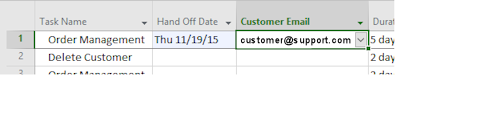
You'll notice that our task list in Microsoft Project has two columns for our custom fields.
You can now enter those values into the project. These values can be edited right inline or through the Issue Editor. By selecting the task and choosing the "Issue Editor" option under the tools menu, we can display the issue editor dialog. In the Issue Editor there is a Custom Fields tab that will list these fields and allow you to enter appropriate values.
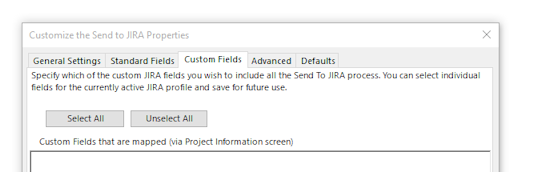
Next we'll send this data to JIRA using the Send to JIRA function. You will need to make sure that you have checked to include your custom fields. This is done in the Customize screen on the Custom Fields tab, be sure that the fields have check marks in front of them.
Without these options checked, The Connector will skip over the custom field's values.
Once the information is sent to JIRA, you'll notice that the values you have provided are displayed under the issue.
If we edit the issue through JIRA and alter one of the values, we can do an Update from JIRA and pull this information back into Microsoft Project. Again you will want to verify that the custom fields are included in the update. This is done in the Customize screen on the Custom Fields tab, be sure that the fields have check marks in front of them.
Setting up Enterprise Custom Fields
The Connector will allow you to map information to Enterprise Custom Fields in Microsoft Project. NOTE: This option is only applicable if you are running Microsoft Project Server edition.
To configure this information you will need to go into the Project Information screen and click on the Custom Field Mappings tab.

Clicking on the Setup Enterprise Custom Fields button will allow you to specify what fields you want available.
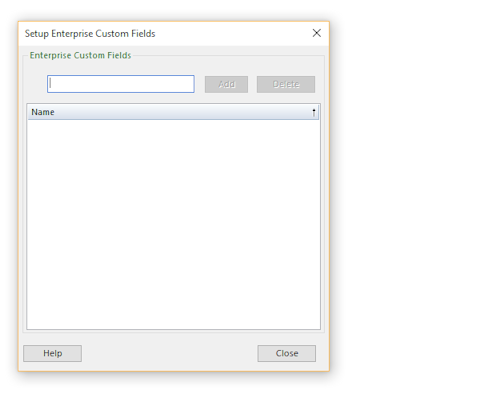
When you enter the field name and click on the Add button The Connector will validate the field name with Project Server and then add it to the list. Once you have setup the field then it will be available for mapping any of the fields you wish to map to it.
Working With Sub Tasks
The Connector supports the import and creation of JIRA sub-tasks through Microsoft Project. In Microsoft Project, a sub-task is a task that is indented under its parent.
NOTE: The indention level in Microsoft Project is not a requirement for a JIRA sub-task. You can have an indented task in Microsoft Project that is not a sub-task and you can have a JIRA sub-task in Microsoft Project that is not indented. This is entirely dependent on your requirements and how you are using The Connector.
Before going through creating a sub-task in Microsoft Project, let’s go through what needs to be setup in The Connector.
- On the JIRA Profile screen the Use Extended Web Services option must be turned on.
- In the Configure The Connector screen on the Default Mappings tab you must check the option Parent Issue ID and specify a Text field to map this to.
- On the Send to JIRA Customize screen check these options.
- Create new tasks in JIRA that are currently unlinked.
- Auto resolve parent/child issues based on indentation.
- Need to have the default values filled in on the Defaults Tab of the Send to JIRA Customize screen.
We first enter the Parent task in Microsoft Project (This can be done either by entering the information in-line or using the Issue Editor). Then select the Send to JIRA option, this will create an issue in JIRA. After the process is completed, you will see the issue ID in the Microsoft Project task.
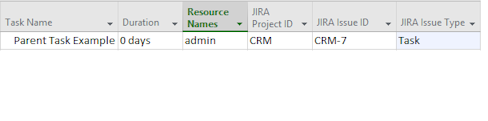
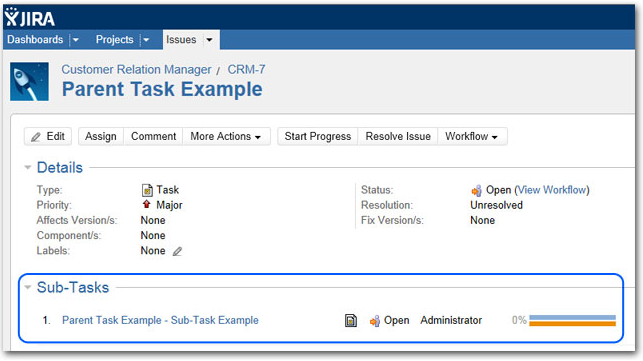
Checking in JIRA, you will see the newly created issue. To create a sub-task for this Parent task you will enter the task in Microsoft Project right below. Then once entered click Task on the Project Ribbon and indent the task
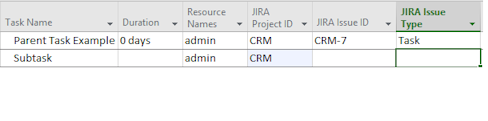
Before we send this task to JIRA, we'll need to indicate to The Connector that this task is a sub-task. To do this, you will need to use the Issue Editor.
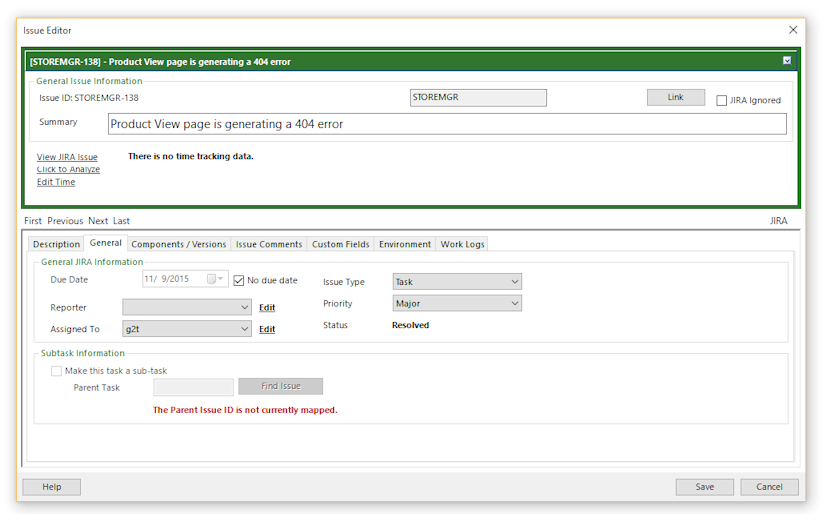
Once you have the Issue Editor open, select the General tab. On the bottom of the tab place a check in front of Make this task a sub-task to indicate that this will be a sub-task. You'll notice that The Connector will automatically fill in the Parent Issue ID. Using the Indent Level of the project sheet does this.
NOTE: It is possible to indicate a different parent task to The Connector, and when this task gets created in JIRA, it will be created under the specified parent.
Click the Save button to save what we have changed. Finally, use the Send to JIRA button to create the sub-task in JIRA. After this process, you will see the new issue ID of the created JIRA issue, the JIRA Issue Type will be Sub-task and the JIRA Parent Issue ID will equal the JIRA Issue ID of the parent task in the Microsoft Project plan.
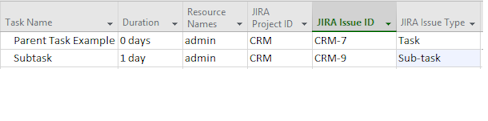
Check JIRA to see the newly created sub-task under the parent task.
Using Parent Tasks as Summary Tasks
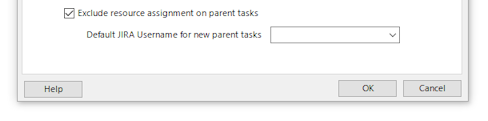
The Connector also allows you to use Parent Tasks as a summary in Project. This is done by not assigning a resource to the parent tasks.
To set this up in The Connector go to the JIRA Profile and click on the Resources tab. Place a check in the option to Exclude resource assignment on parent tasks.

You will then need to specify a default JIRA Username. This is used if you create a Parent task in Microsoft Project and attempt to send it to JIRA, JIRA requires that all tasks have an assignee.
With this option turned on when importing or updating tasks from JIRA The Connector will not import a resource for any Parent Tasks and therefore Microsoft Project will not add time to your duration for the resource on the Parent Task.
Here is some additional information about working with sub-tasks:
Updating Sub Task Durations
Importing Sub Tasks
Data Exchange Rules
Data exchange rules allow you to configure different rules for linking issues in Microsoft Project and in JIRA.
To access this function click on Configure, select the JIRA profile and click Edit. Click on the Advanced tab and then click the Configure Data Exchange Rules button.
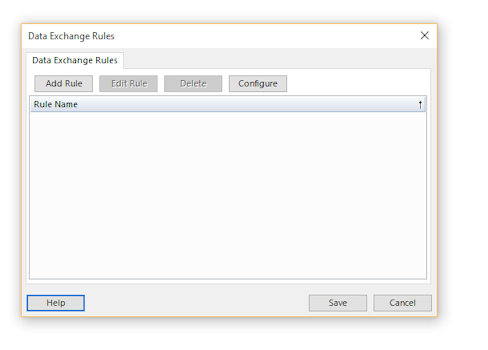
The Data Exchange Rules window will show you all of the rules you currently have configured. From this screen you can add a new rule, edit an existing rule, or delete an existing rule.
By toggling the check box next to the rule, you can enable/disable the active status of the rule. This will allow you to leave a rule configured, but temporarily disable it when needed.
Using the Configure button will allow you to import and export rules.
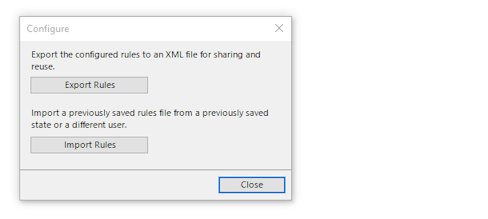
This is helpful for sharing configured rules with different users. Pressing the Export Rules button will give a you a Microsoft Windows Save As dialog box where you can specify a location to save the file. The rules are stored in an XML file that another user can import using the Import Rules option.
Creating a Rule
Click the Add Rule button on the dialog box to create a new Data Exchange Rule. This will open a window where you can specify the type of data exchange rule to use.
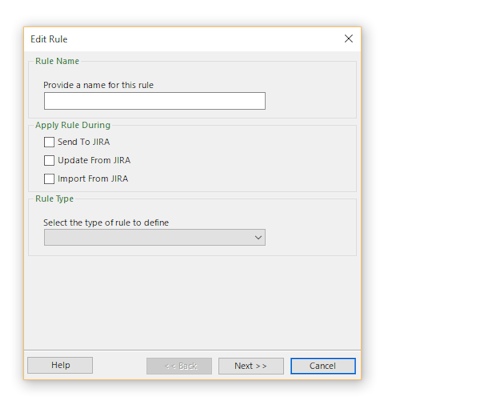
Provide a meaningful name for the rule that you wish in the Rule Name box.
You can specify during which actions you wish to have the rule executed. This allows you to create a rule that is only applied during the Send To JIRA function. Doing so would not run the rule when Update From JIRA is performed.
There are currently two types of rules from which to pick.
- Issue Exclusion: The issue exclusion rule allows you to exclude a type of issue if the specified link is encountered.
- Example: When performing planning, any issue that is a "duplicate" of another issue should not get scheduled since scheduling it would cause a doubling of effort. You can configure the rule to exclude any JIRA issues that are flagged as duplicates of another.
- Issue Linking:The issue linking rule allows you to map Microsoft Project predecessor or successor fields when a specific type of JIRA issue link is encountered.
- Example: You want your Microsoft Project plan to automatically create a dependency link if it detects that JIRA has an issue link of "depends on".
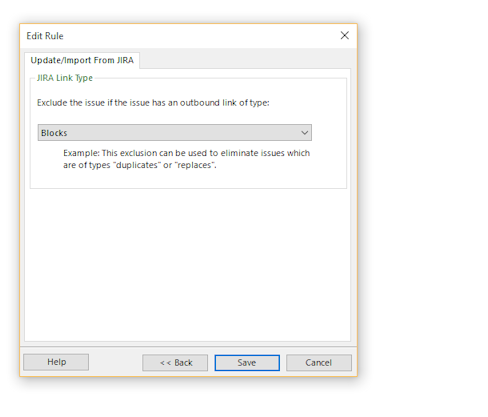
Issue Exclusion
Since we would only worry about excluding duplicates if we were bringing data from JIRA to Microsoft Project, we would only check the "Update From JIRA" and "Import From JIRA" options in the "Apply Rule During" area.
Issue Linking
Creating a Data Exchange Rule for a dependency allows you to specify how you want the dependency to link in Microsoft Project.
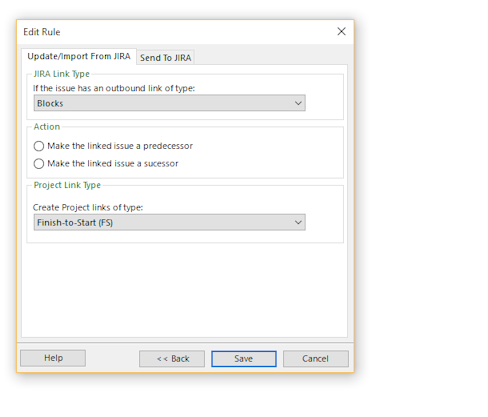
First configure what is needed for the Update / Import from JIRA.
- Specify the type of outbound link The Connector will look for from JIRA to apply this rule. The choices include Blocks, Cloners, Duplicate, and Relates.
- Select the action that The Connector will do when it finds one of these links.
- Make the linked issue a predecessor
- Make the linked issue a successor
- Select the Microsoft Project Link Type - The Connector supports the four types of linking in Microsoft Project.
- Finish-to-Start
- Start-to-Start
- Finish-to-Finish
- Start-to-Finish
Then click the Send to JIRA tab and specify what The Connector needs to do when sending to JIRA.
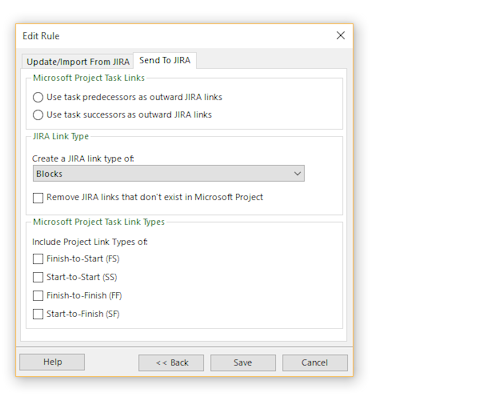
- Specify which of the linked tasks will be used as the outward JIRA link
- Use task predecessors as outward JIRA links
- Use task successors as outward JIRA links
- Specify the type of JIRA link to create. The choices include Blocks, Cloners, Duplicate, and Relates. (This will be the same as what was specified on the Update/Import tab.
- Remove JIRA links - this will remove any JIRA links that are not in Microsoft Project.
- Choose the Project link types to include
- Finish-to-Start
- Start-to-Start
- Finish-to-Finish
- Start-to-Finish
Click Save and the rule will be saved and active.
Duration And Work
The Duration and Work Configuration dialogs allow you to control how The Connector handles and maps the time values from JIRA. To access this function click on Configure, select the JIRA profile and click Edit. Click on the Advanced tab and then click the Configure Duration and Work button.
JIRA has 3 time values (original estimate, remaining estimate and time spent). These typically can be mapped to the Microsoft Project fields (Work, Remaining Work, Actual Work) to connect the time values of the two systems.
This is not the only mapping possibility, however. The Connector can be mapped to a variety of other fields depending on your needs.
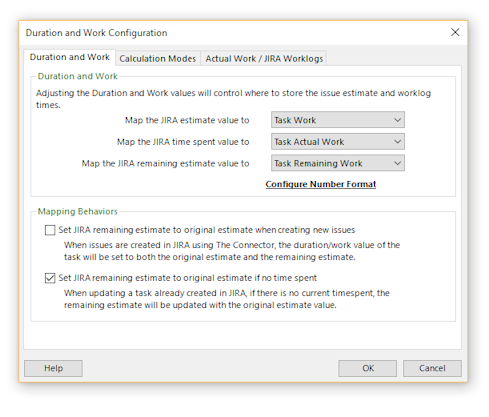
Set JIRA remaining estimate to original estimate while create new issues: If this option is enabled, the remaining estimate and original estimate will be updated to the save value when new issues are created. By default, on the originate estimate is typically updated in JIRA.
Set JIRA remaining estimate to original estimate if no time spent: If this option is enabled, the remaining estimate value get set to whatever the original estimate is provided there has been no work done on the issue. The idea is that if no time has yet been spent on this task, set both the original estimate and remaining estimate equal to the amount of work required for the task.
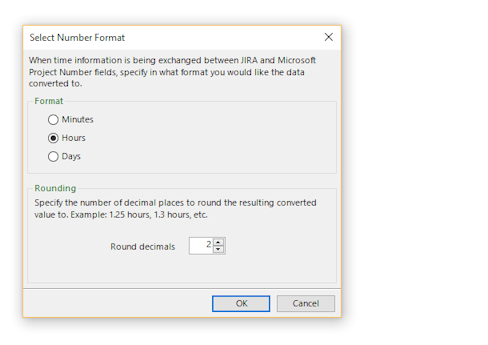
Configure Number Format: This allows you to specify the format and rounding of the time information being exchanged between JIRA and Microsoft Project.
Calculation Modes
The Connector supports 3 different types of calculation modes. The calculation mode determines how the value for the work or duration is calculated when it is updated in Microsoft Project.

Basic Calculation: this will simply map the JIRA original estimate value to the duration or work field (depending on your configuration).
Adjusted Calculation: The adjusted calculation mode will take the JIRA remaining estimate and add it to the time spent on the task to calculate the new duration of the task. This mode is used if you wish to have your project plan updated with values that represent the "current" time estimate of a task. For example, a task may be originally estimated at 6 hours, but after 2 hours are spent, it gets updated with a remaining estimate of 2 hours. After the update is done, your project plan will reflect the 4 hour task estimate (2 hours remaining + 2 hour spent).
Remaining Estimate if present: This option is used if you wish to have your project plan update to reflect the "remaining effort" necessary to complete the tasks. From a scheduling standpoint, you may wish to only work against what is known to be left to complete. With this mode, your Microsoft Project tasks will get updated with a duration of what is left to complete the task (JIRA remaining estimate).
Actual Work / JIRA Worklogs
The Connector has several different options for configuring how work logs from JIRA get interpreted by Microsoft Project.
If the Enable updating the task duration/work option is unchecked, The Connector will ignore all use of the duration field. Using the other two check boxes, you can control during which events the values are used (the update from JIRA, the import or both).

Update Microsoft Project Work/Duration from JIRA timespent: If this option is used, The Connector will update the values using the JIRA timespent value and will ignore the work logs. Most of the time, JIRA will have the same value in this field as it has for the total of the work logs that have been entered, but it does not necessarily have to be the same.
Update Microsoft Project Work/Duration using JIRA work logs: If this option is used, The Connector will ignore the value in the timespent field of the JIRA issue and it will use the values of the work logs to calculate the total based on your Work log Configuration settings.
Work Log Configure - additional information
Internet Proxy Settings
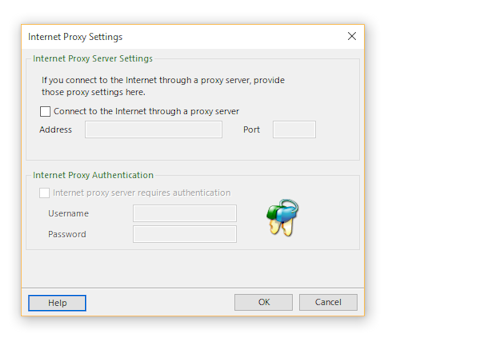
The Internet Proxy Settings will let you provide the proxy settings in order to connect to the Internet. This screen is accessed by clicking on Configure, then clicking on the Settings tab and then clicking the Configure Proxy Settings link. If your network requires that you go through a proxy server to access the Internet, enter in the proxy setting information into this dialog. You can provide an address and port number and an optional authentication information should your proxy server require this.
Shared Import Profile Configuration
Import Profile Sharing will allow your saved import profiles to be accessed by other users. This allows a team or group of users to re-use and share commonly used import profiles.
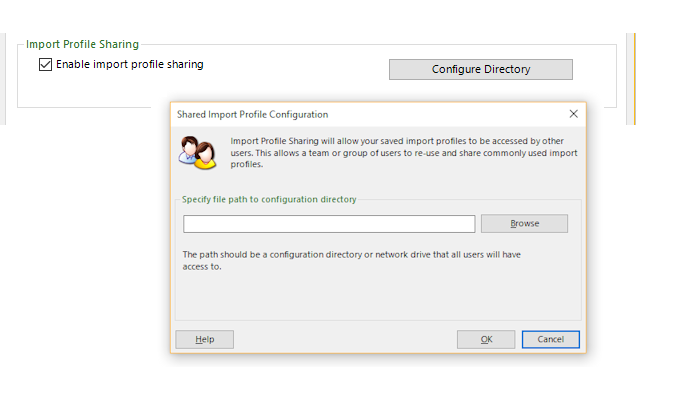
To enable this option click on Configure, and then the Settings tab. Place a check in from of Enable import profile sharing and then click on the Configure Directory button. Specify a network location that is accessible by all the users wishing to share import profiles.
Once configured, users will be able to share the same import profile with each other.
This is done in the Manage Import Profiles screen. Select the profile that you want to share and click the Share button. There will be a question asking if you are sure you wan to share the profile.
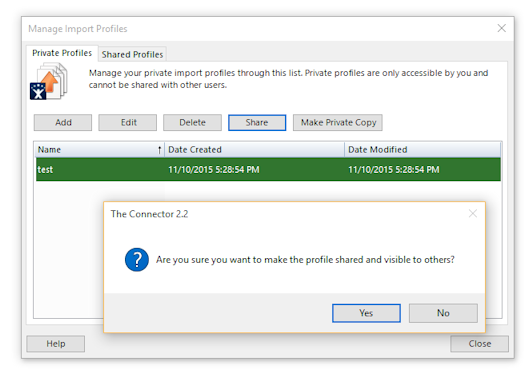
After clicking Yes the profile will be moved from the Private Profiles tab to the Shared Profiles tab. Now other users will be able to select this profile when using The Connector Import Wizard.
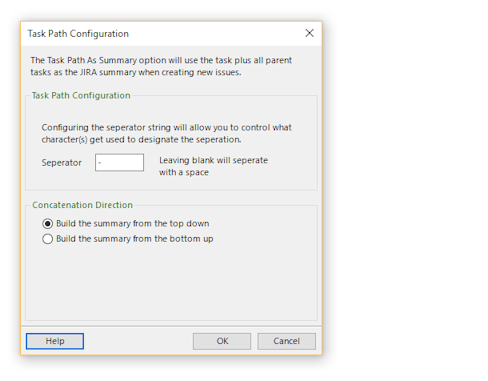
Task Path Configuration
The Task Path Configuration option of The Connector allows you to use the Microsoft task hierarchy description as the issue description when creating a new task. To enable and configure this function click the Customize option for the Send to JIRA. Then click the Advanced tab and place a check in the option Enable task summary path for creating tasks. Click on the Configure link to customize how the Task Path should be built. You can configure both the separator character as well as the direction in which the description is generated.
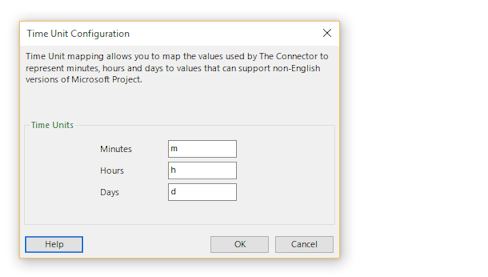
Time Unit Configuration
The Time Unit Configuration allows you to map the values for non-English versions of Microsoft Project. You can specify the values that the language version of Microsoft Project needs to represent the Minutes, Hours and Days.
NOTE: This is only necessary when using a non-English version of Microsoft Project