The Connector is a Microsoft Project extension plug-in that allows users of Microsoft Project to connect and exchange data with Atlassian’s issue management system, JIRA. The product creates a custom toolbar in Microsoft Project from which access to the functionality of the connector can be accessed.
System Requirements
The Connector requires:
- Microsoft Project 2003, Microsoft Project 2007, Microsoft Project 2010, Microsoft Project 2013 or Microsoft Project 2016
- Atlassian JIRA 3.6 or greater
- Microsoft .NET 4.0 or greater
Required for extended functionality of The Connector:
- The Connector extended web services available for download from the www.the-connector.com website.
Installation
Plug-in Installation
To install the plug-in, run the Trial Version installer available on the www.the-connector.com website. Once the plug-in is installed, you will get a registration key dialog when you run Microsoft Project. Enter your product key that was emailed to you when you purchased the product and the plug-in will be unlocked to full functionality.
The Connector Extended Web Service Installation
The extensions to the JIRA web services will provide the connector with some enhanced functionality. Follow the instructions below to install the extensions.
If you have Atlassian JIRA 3.6 or greater:
Download the JIRA Services for The Connector 2.2 from the website.
Unzip the file com.ecliptictech.connector.jar and copy it to the WEB-INF/lib directory located under your JIRA installation root directory. This may vary from version to version on installation process.
Enable the RPC extensions in JIRA
Restart JIRA
If you are using Atlassian JIRA 5.0 or greater:
Download the com.ecliptictech.connector-2.2-jira5.zip file
Unzip the file com.ecliptictech.connector-2.2-jira5.jar and copy it to the installed-plugins directory located under your JIRA data directory.
Enable the RPC extensions in JIRA
Restart JIRA
NOTE: If you have placed the .jar file in the incorrect directory be sure to remove it before copying it to the correct place.
Enabling JIRA Web Services
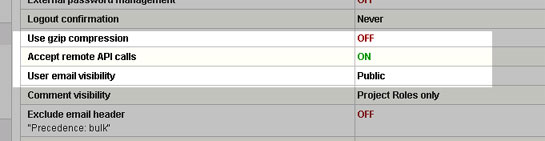
For the plug-in to work, the built in JIRA web services must be enabled. This is enabled under the Administration section of JIRA in the General Configuration area. Make sure the “Accept Remote API calls” option is turned on.
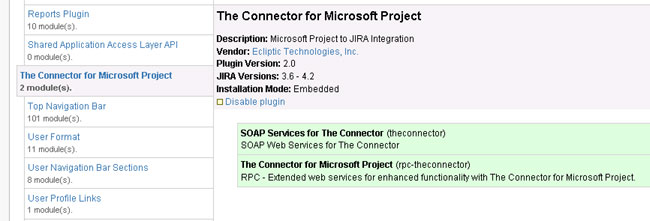
If the services are correctly installed, you should see an entry in the “Plugins” section of the JIRA administration.
Activating The Connector
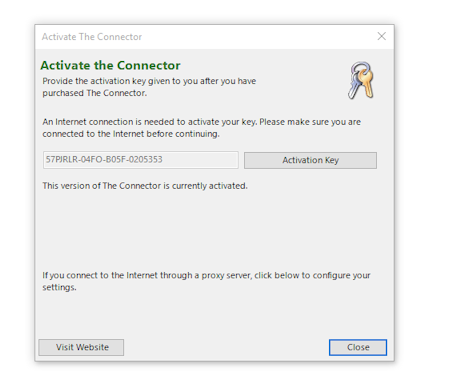
Once you have purchased The Connector, you recieve an activation key. This key will need to be entered into The Connector's activation dialog to fully activate The Connector for use. Copy the activation key from the email you recieved after the purchase into the textbox on this dialog and press the "Activate" button. You will need to make sure you have an active Internet connection during the activation process.
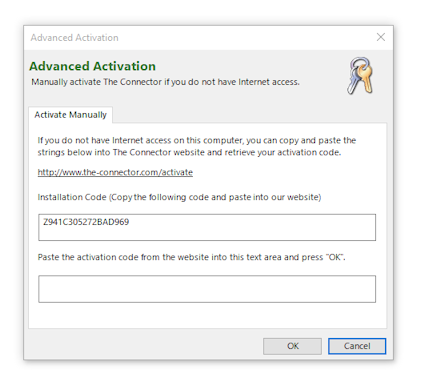
If you do not have an Internet connection to allow The Connector to automatically activate, you can use the manual process. You will still need to get to an Internet connector, but you can get the installation code from The Connector and manually generate the activation key that will unlock the full version of The Connector.